Senin, 29 Oktober 2012

10 Steps To Designing An Infographic

| |
0 komentar

Information can be useful--and even beautiful--but only when it’s presented well. In an age of information overload, any guidance through the clutter comes as a welcome relief. That’s one reason for the recent popularity of information graphics. Infographics are visual designs that help to explain complicated data in a simple way (mental-health emergencies at Burning Man, anyone?). But how are they created? What can we learn from the designer’s process? And what does an infographic designer know about storks delivering babies?
Over the last decade, Hyperakt has come to specialize in this type of design, and we’ve found a process that works for us. Here’s how we go about creating an infographic in ten steps:

1.GATHERING DATA

Sifting through data is where it all begins. It arrives raw and messy: an excel spreadsheet, some PDFs and links to other resources are typical. While there is sometimes guidance--"We’d like to compare the charts on pages 12 and 65"--we take this as a clue to find the story being told. This is also when we begin to gather additional research from new sources. The full picture of a story is usually found scattered through multiple materials, not in isolated charts alone.

2. READING EVERYTHING

While it’s tempting to read only the highlighted facts and skim the rest, this shortcut tends to result in more time wasted later. Single pieces of information in an ecosystem of research can skew the big picture. Either your client will realize this during the process, or the audience will point it out once the project is complete. Nothing feels worse than working hard on a project, then seeing it picked apart because you didn’t connect the dots. Designers who make infographics are adept at spotting holes in the data, ensuring that no important information has been missed, and making sure the facts support the story being told.

3. FINDING THE NARRATIVE

What starts as boring data will become a boring infographic unless a great story can be found. Infographics start with a unique intent. It might be clarifying a complex set of data, explaining a process, highlighting a trend, or supporting some kind of argument. Finding a great narrative is the first hurdle. Now that the data is familiar, does it seem possible to tell this story with the information at hand? Are you interested in the subject matter? Is this a compelling story worth telling?

4.IDENTIFYING PROBLEMS

As a story emerges from the data at hand, it’s time to stop for a reality check. In many cases, the data doesn’t support the story a client wants to tell. What follows is usually a slightly awkward discussion. Sometimes a client will want the designer to use only the facts that make them look good, twist the data, or otherwise get around this snag. It quickly becomes evident that this pathway is futile for everyone. The data doesn’t lie, and good clients do not want to blatantly mislead. is the next step is a collaborative reworking of the story and the data. Having studied the topic for several days, the designer is a valuable guide to discovering more accurate narratives and presenting them. Pushing back on a client’s original idea can be a frustrating moment. In more subjective situations (color, typography, etc.), it is harder for a designer to win battles, but in these situations the designer’s careful eye for detail is obvious in the data--and often appreciated.
The truth in information takes experience to uncover. Data has a way of winning a debate, whether an argument is true or not. For example, drivers who own red cars are twice as likely to get into accidents than drivers who own blue cars. This truth may (incorrectly) imply that car color somehow causes driving accidents. But the true story is found in a hidden connection, known as the confounding variable. Aggressive personality types are shown to prefer the color red. This aggressive behavior, not car color, is the undisclosed reason that accident rates are affected.

5. CREATING A HIERARCHY

In almost any piece of research, there is a “hero” that leads the story. This piece of data will make your jaw drop. Once you find it, it becomes a way to organize the project and solidifies the hierarchical structure of the infographic. Supporting elements are then arranged to tell the rest of the story. This becomes a kind of mood board of research points. At this stage, the picture of a final product will begin to appear.

6. BUILDING A WIREFRAME

Once the data has been combed, the most interesting facts selected, and a hierarchy determined, a wireframe is created. Here, the designer builds an understandable visual representation of the important information and its hierarchy to send to the client for review. This is not the ultimate design but a tool for discussion, enabling agreement on the structure the final piece will take.

7. CHOOSING A FORMAT

There are endless ways to represent information. The best approach might be with traditional charts and graphs (bar, line, pie charts). It might require a diagram or flowchart to explain a process. A map might be the best way to tell the story. Or perhaps simply showcasing the numbers is best. If the budget is available and the data warrants it, interactivity might make sense and opens a world of possibilities for data visualization. Whatever the case, this decision is guided by the data, which will lend itself to one or a combination of these formats.

8. DETERMINING A VISUAL APPROACH

There are two overarching visual approaches to determining the look and feel of an infographic. In one camp, there are those who prefer to make the raw data beautiful (David McCandless, Nicholas Felton, and others subscribe to this view). These often take the form of charts and graphs, made visually exciting by their execution. The use of color, typography, and structure make the piece engaging, like an abstract work of art. Those in the second camp (Peter Orntoft, Scott Stowell), prefer to use illustration or metaphor. Here, the data is disguised, delivered to its audience in a visual narrative often bearing little resemblance to a chart or graph.
At Hyperakt, we are not beholden to any one strategy. Often we create a hybrid: charts and graphs surrounded by more illustrative elements, or a pure visual overlaid with traditional representations of data. The available information, medium, client brand, and subject are what determine an ultimate solution.

9. REFINEMENT AND TESTING

As the infographic takes shape and a visual form, refinements begin. Clients are involved in working through details, both in the data and the visual storytelling, to ensure that the finished product meshes well with their brand and original intent. Internally, we include the entire studio in a testing phase to ensure that the piece is readable and easy to understand, especially to those who have not seen the data before. We evaluate the design and iterate until the piece is as clear and simple as possible. This valuable back and forth between clients and our internal team ends when everyone is comfortable that we’ve delivered the information in the best possible way.

10. RELEASING IT INTO THE WORLD

Most infographics are shared online--even printed illustrations appear online in some fashion. This is the litmus test of your work. Data has the interesting characteristic of being read in many ways by different audiences. All of the fact-checking and expertise imaginable doesn’t mean you’ve discovered every aspect to the story. So even once your piece is published, online discussion can expand (or tear apart) your argument in new ways. This collective vetting often means the project is never quite done. Revisions might happen as new data comes to light. While it is intimidating to let your project become a part of this process, it is also the reason the medium is so rewarding. An intensely scrutinized design is one that has stirred the minds of its audience.

Infographic designers are unusual people. Though budgets rarely account for this involved process, their labor of love continues. Get to know an information designer and prepare to hear some strange facts: Who was the most chillwave band of 2011? Is driving why you’re fat? What are the top five cosmetic procedures in the U.S.? They might even reveal a data geek’s example of causation that explains the storks-and-babies folk tale: The data shows that the more storks in a town, the more newborn babies there will be. But the hidden variable is a town’s land area: the larger the town, the more babies are born there--and, of course, the more habitable area for storks, too.
Read More

Minggu, 28 Oktober 2012

BRAND

| |
0 komentar


Brand/merek adalah istilah, tanda, simbol, desain atau kombinasi dari semuanya ini yang dimaksudkan untuk mengidentifikasikan produk atau jasa dari seorang atau sekelompok penjual, yang membedakan produk/jasa tersebut dengan produk lain terutama produk saingannya”

Beberapa kriteria yang harus diperhatikan dalam pemilihan elemen merek:

1. Mudah diingat
Artinya elemen merek yang dipilih hendaknya yang mudah diingat, dan disebut/diucapkan. Simbol, logo, nama yang digunakan hendaknya menarik, unik sehingga menarik perhatian masyarakat untuk diingat dan dikonsumsi.

2. Memiliki makna
Artinya elemen merek hendaknya mengandung sebuah makna maupun penjelasan/ deskripsi dari produk. Diharapkan makna ini dapat mempengaruhi konsumen untuk mengkonsumsi produk tersebut.
Deskripsi makna yang terkandung dapat berupa:
a. informasi umum tentang kategori dan isi dari produk
b. informasi tentang komposisi penting yang ditonjolkan produk dan manfaat dari produk.

3. Menarik dan lucu
Pendekatan lain untuk menarik perhatian konsumen adalah dengan variasi elemen merek yang unik, lucu, pemilihan elemen yang kaya akan visualisasi dan imajinasi. Dalam hal ini yang ditonjolkan adalah desain yang menarik dan lucu.

4. Fleksibel
Artinya elemen merek dapat dimengerti dan tetap dapat diterima oleh daerah/pasar, bahkan budaya lain. Nama yang digunakan pun tidaklah terlalu sulit untuk diterjemahkan. Seringkali pemilihan elemen merek mudah diingat oleh masyarakat lokal, namun sangatlah sulit dimengerti oleh masyarakat lain. Hal ini tentunya akan menghambat produsen untuk masuk dalam pasar yang baru.

5. Legal
Artinya brand elemen tersebut sah menurut hukum dan undang–undang yang berlaku, sehingga berada di bawah perlindungan hukum.

Karakter brand supaya menjadi brand yang berpotensi:
1. A quality product
Sejak kepuasaan konsumen digunakan untuk mengukur nilai-nilai merek (brand values), kualitas adalah nomor satu yang diinginkan konsumen.
2. Unique positioning concept
Merek harus memiliki posisi konsep yang unik, yang akan membedakan dari pesaingnya
3. Strong communications program
Brand yang sukses harus disertai dengan penjualan yang efektif, pengiklanan, kampanye promosi yang akan mengkomunikasikan fungsi dari brand itu dan nilai-nilai yang terkandung di dalamnya. Dengan usaha yang keras, dan komitmen untuk memperkuat komunikasi itu, maka akan menimbulkan kesadaran konsumen akan brand tersebut.
4. Time and Consistency
Merek tidak dibangun dalam waktu yang cepat, membutuhkan waktu untuk membangun merek tersebut dan nilai-nilai yang ada di dalamnya. Dalam memelihara nilai-nilai merek dibutuhkan waktu yang berkesinambungan (terus– menerus) dan dihubungkan dengan perubahan lingkungan.

Fungsi brand (merek) :   
1. Bagi konsumen :   
 a. Identifikasi mutu produk.Mutu/kualitas produk berupa barang nyata/tampak dari kondisi      barang tersebut, baik dari kualitasnya sampai pada kemasan barang.
 b. Merek meningkatkan efisiensi pembeli. Dengan adanya merek maka akan memudahkan pembeli menemukan produk yang dicari. Hal ini tentunya lebih efisien dan efektif.
 c. Membantu menarik perhatian konsumen atas suatu produk baru yang mungkin memberikan keuntungan bagi mereka.

2. Bagi produsen, penjual :
 a. Memudahkan penjual untuk memproses pesanan dan menelusuri masalah yang timbul.
 b. Sebagai perlindungan hukum terhadap ciri khas produk, sehingga tidak ada produk lain  yang meniru.
 c. Membantu penjual dalam melakukan segmentasi pasar
 d. Membantu penjual dalam menarik konsumen yang setia dan yang menguntungkan.
 e. Membantu membangun citra perusahaan/produsen
 f. Mengidentifikasikan produk dalam perdagangan
 g. Mengidentifikasikan keunggulan produk yang dimiliki, yang membedakan produk tersebut dengan produk lain, terutama produk saingan.

Beberapa keuntungan dengan terciptanya brand image yang kuat adalah:
1. Peluang bagi produk/merek untuk terus mengembangkan diri dan memiliki prospek bisnis yang   bagus.
2. Memimpin produk untuk semakin memiliki sistem keuangan yang bagus.
3. Menciptakan loyalitas konsumen
4. Membantu dalam efisiensi marketing, karena merek telah berhasil dikenal dan diingat oleh konsumen.
5. Membantu dalam menciptakan perbedaan dengan pesaing. Semakin merek dikenal oleh masyarakat, maka perbedaan/keunikan baru yang diciptakan perusahaan akan mudah dikenali konsumen.
6. Mempermudah dalam perekrutan tenaga kerja bagi perusahaan.
7. Meminimumkan kehancuran/kepailitan perusahaan.
8. Mempermudah mendapatkan investor baru guna mengembangkan produk.

Keberadaan merek bukan hanya semata–mata menunjukkan nama dari sebuah produk, namun lebih dari itu, merek menunjukkan nilai tambah dari produk dalam berbagai dimensi, yang membedakan produk tersebut dengan produk lain.
Kesuksesan dalam membangun merek yang kuat akan tercipta apabila elemen-elemen pendukung merek  ada dan memberikan kontribusi yang positif guna terciptanya merek yang kuat di pasaran. Elemen–elemen yang dimaksudkan di sini adalah kualitas produk yang baik, kemampuan produk dalam memenuhi kebutuhan ataupun keinginan konsumen, kemampuan strategi marketing yang handal untuk terus memperkenalkan merek di pasaran, sampai pada kemasan produk yang benar, baik dan menarik, harga produk yang sesuai dengan kualitas produk yang ditawarkan.
Dengan demikian, merek dapat terus dikenal, menjadi perhatian dan terus dikonsumsi oleh masyarakat (menciptakan keloyalan konsumen), dipercaya, sehingga merek tersebut menjadi merek yang kuat di pasaran.

BRAND EQUITY

How to Building Brand Equity 

1.Definisi dan Pengertian Merek
Merek merupakan nama, istilah , tanda, symbol. Lambang, desain, warna, gerak atau kombinasi atribut-atribut produk lainnya yang diharapkan dapat memberikan identitas dan diferensiasi terhadap produk pesaing. Pada dasarnya suatu merek juga merupakan janji penjual untuk secara konsisten menyampaikan serangkaian cirri-ciri , manfaat dan jasa tertentu kepada para pembeli. Merek yang baik juga menyampaikan jaminan tambahan berupa jaminan kualitas.
Merek sendiri Mempunyai peran  yaitu :
1. Sebagai identitas, yang bermanfaat dalam diferensiasi atau membedakan produk suatu perusahaan dengan produk perusahaan saingannya. Ini akan memudahkan konsumen untuk mengenalinya saat berbelanja dan saat melakukan pembelian ulang.
2. Alat promosi, yaitu sebagai daya tarik produk.
3. Untuk membina citra yaitu dengan memberikan keyakinan, jaminan kualitas, serta prestise tertentu kepada konsumen.
4.Untukmengendalikanpasar.
Merek memegang peranan penting dalam pemasaran. Ada perbedaan yang cukup besar antara produk dan merek (Aaker, 1996). Produk hanyalah sesuatu yang dihasilkan pabrik. Sedangkan merek merupakan sesuatu yang dibeli konsumen. Bila produk bisa dengan mudah ditiru pesaing maka merek selalu memiliki keunikan yang relative sukar untuk dijiplak. Merek berkaitan erat dengan persepsi, sehingga persaingan yang terjadi antara perusahaan adalah pertarungan persepsi dan bukan pertarungan produk
 ***

Definisi dari Brand Equity sendiri ada banyak diantaranya menurut Philip Kotller dan Hermawan Kertajaya
Menurut Philip Kotller
 "Brand equity is a set of brand assets and liabilities linked to a brand,its name and syimbol,that add to or substract from the value provided by a product or service to a firm and/or that firms costumer."
Philip kotller mendefinisikan brand equity sebagai sejumlah asset dan liabilities yang berhubungan dengan merek,nama,dan symbol yang menambah atau mengurangi nila dari produk atau pelayanan bagi perusahaan atau pelanggan perusahaan.

Merek yang dimiliki oleh perusahaan akan menjadi kuat apabila memilki Brand Equity yang kuat juga.Brand Equity yang kuat akan memberikan Value yang baik kepada pelanggan maupun kepada perusahaan.
Pelanggan (Costumer):
1) Meningkatkan Interprestasi atau proses penerimaan informasi pelanggan
2) Meningkatkan keyakinan pelanggan dalam keputusan Pembelian
3) Meningkatkan kepuasan mereka dalam menggunakan produk atau jasa
Brand Equity yang kuat akan menimbulkan rasa Nyaman serta meningkatkan keyakinan dalam penggunaan,dan akhirnya akan tercipta kepuasan bagi pelanggan.
Perusahaan(Company)
1) Meningkatkan efisiensi dan efektivitas program pemasaran perusahaan        
2) Meningkatkan kesetiaan terhadap merek
3) Meningkatkan Harga/Margin keuntungan
4) Meningkatkan Brand Extension
5) Meningkatakan Trade Leverage
6) Meningkatkan keuntungan bersaing

a.Atribut Brand Awareness
David Aaker dalam bukunya managing Brand Equity 

"Brand Awareness is the ability of a costumer potensial to recognize or recall that a brand is a member of certain product category."
mendefinisikan Brand Awareeness sebagai kemampuan dari pelanggan potensial untuk mengenali atau mengingat bahwa suatu merek termsuk dalam kategori produk tertentu
Brand Awareness sendiri memberikan value antara lain:
1.memberikan tempat bagi asosiasi terhadap merek
2.memperkenalkan merek
3.merupakan sinyal bagi bagi keberadaan komitmen dan substansi merek
4.membantu memilih kelompok merek untuk di pertimbangkan dengan serius.
Berikut adalah tingkatan dari brand Awareenes
1.Unaware of brand:Tahapan ini pelanggan merasa ragu atau tidak yakin apakah sudah mengenal merek yang disebutkan atau belum
2.Brand Reconition:Pada Tahap Ini pelangganmampu mengidentifikasi merek yang disebutkan
3.Brand Recall:Pada Tahap ini pelanggan mampu mengingat merek tanpa di berikan stimulus
4.Top Of Mind :Pada Tahap Ini pelanggan mengingat merek sebagai yang pertama kali muncul di pikiran saat berbicara mengenai kategori produk tertentu
Contoh Brand Awarenees
1.Unaware Brand : Asepso menjadi merek sabun mandi yang tidak begitu di kenal konsumen karena potitioning sabun tersebut sebagai antiseptic
2.Brand Recognition: Dove disebutkan oleh konsumen dengan mengidentifikasi mereknya
3.Brand Recall:Lux disebut konsumen setelah adanya stimulus mengenai merek tersebut
4.Top Of Mind : Lifebuoy menjadi merek yang favorit yang langsung di sebutkan oleh konsumen pertama kali saat di Tanya tentang kategori produk sabun mandi.
b.Atribute Brand Association
David Aaker dalam bukunya Managing Brand Equity mendefinisikan brand assotiation sebagai segala sesuatu yang berhubungan di memori pelanggan terhadap suatu merek.
“Brand Association is anything linked in memory to a brand”
Brand Association memberikan banyak Value antara lain :
1.Memudahkan pelanggan untuk mendapatkan informasi tentang merek
2.Mempengaruhin interpretasi pelanggan atas fakta mengenai merek
3.Membedakan Merek dari merek pesaing
4.memperkuat posisi merek di pasar
5.alasan pelanggan untuk menggunakan merek
6.Dasar untuk melakukan pelunasan merek

Contoh Asosiasi merek dengan atribut produk
1.Pepsodent whitening diasosiasikan dengan pasta gigi yang dapat memutihkan gigi
2.sensodyne diasosiasikan dengan pasta gigi khusus gigi sensitive
3.Close Up Flavalicious diasosiakan dengan pasta gigi denga rasa permen dan buah
c.Atribute Brand Loyalty
David Asker dalam bukunya managing Brand Equity mendefinisikan bahwa brand loyalty adalah sebuahukuran ketertarikan pelanggan terhadap suatu merek
“Brand Loyalty is a measure of the attachment that a costumer has to a brand”
Tingkat ketertarikan pelanggan terhadap suatu merek dapat terbagi dalam empat tingkat yaitu:
1.Switchers/Price sensitive
Pada Tingkat Ini pelanggan tidak loyal kepada merek atau belum memiliki brand Equity yang kuat
2.Satisfied/Habitual Buyer
Pada Tingkat Ini pelanggan merasa puas terhadap produk atau setidaknya tidak merasa tidak puas terhadap produk perusahaan.
3.Satisfied buyer with Swtihcing cost
Pada Tingkat ini pelanggan merasa puas terhasdap produkmereka yang harusmengeluarkan biaya tertentu apabila ingin berpindah merek.
4.Comitted Buyer
Pada Tingkat ini poelanggan memilki rasa bangga menggunakan produk yang di tawarka oleh sebuah perusahaan.
Contoh Tingkatan Brand Loyalty
1. Switchers/Price sensitive
Untuk produk rumah,bagi segmen menegah kebawah harga sangat berpengaruh terhadap keputusan pembelian
2. Satisfied/Habitual Buyer
Konsumen yang terbiasa makan permen rasa mint cenderung memilih permen apa saja asal memiliki rasa mint,biasanya pada tingkatan ini konsumen memilih produk yang fast moving ciri lainnya ditandai dengan diferensiasi yang kecil
3. Satisfied buyer with Swtihcing cost
Penumpang pesawat kelas bisnis merasa lebih puas meski harganya lebih mahal disbanding kelas ekonomi karena adanya benefit lebih yang mereka dapatkan
4.Comitted Buyer
Pelanggan pda tingkatan ini sangat tidak terpengaruh dengan penawaran tinggi dari pesaing.pengguna motor Harley davidson merupakan contoh dimana mereka rela membeli segala sesuatu yang berhubungan dengan merek tersebut meski dengan harga yang cukup mahal.
  
d.Atribute Perceived Quality
David Aaker dalam bukunya Managing Brand Equity mendefinisikan Perceived quality sebagai persepsi pelanggan terhadap kualitas atau keunggulan suatu produk atau jasa sehubunngan dengan tujuan yang diinginkannya,dibandingingkan dengan altrernatif-alternatif yang lain
“Perceived Quality is the costumer perception of the overall quality or superiority of a product or service with respect to its intended purpose relative to alternative”
Perceived Quality memberikan banyak Value antara lain:
1. Memberi alasan bagi pelanggan untuk menggunakan produk barang atau jasa,semakin baik persepsi pelanggan maka semakin tinggi potensi pelanggan untuk menggunakan produk tersebut
2. Membedakan produk barang atau jasa dengan produk pesaing
3. Memberi celah untuk menetapkan harga premium atas produk barang atau jasa
4. Menciptakan ketertarikan atas saluran distribusi untuk menyalurkan produk barang atau jasa karena roduk di persepsikan dengan baik sehingga akan lebih mudah mendistribusikan ke banyak pasar.
Contoh Indofood di persepsikan positif oleh pasar sebagai perusahaan consumer good yang mengutamakan kualitas,sehingga produk baru mereka yang dikeluarkan olehnya dengan mudah dapat diterima oleh pasar.
e.Atribute other assets
Element brand equity yang akan dibahas selanjutnya adalah other asset.other asset memiliki bagian sebagai berikut:
1.   Keunggulan bersaing dapat menjadi asset atau suatu merek semakin kuat.keunggulan bersaing suatu merek maka brand equity dapat meningkat karena pasar akan mengapresiasikan secara positif terhadap keunggulan tersebut.
2.   Paten dari suatu merek dapat di jadikan asset perusahaan karena dapat menunjukan kualitas dan kredibilats produk sehingga brand equity akan tinggi.
3.   Merek dagang dapat menunjukan bahwa merek suatu produk memiliki nilai jual yang tinggi sehingga brand equity produk bisa tinggi
4.   Hubungan dengan Chanel akam membantu suatu merek karena channel secara tidak langsung akan melakukan branding terhadap produk,semakin baik hubungan perusahaan dengan channel maka semakin tinggi pula usaha channel melakukan branding terhadap produk.
Contoh Other Asset
1.Keunggulan bersaing
Bali memiliki keunggulan bersaing yang lengkap mulai dari keanekaragaman daya tarik alam,social budaya masyarakat yang masih kental,juga daya tarik buatan yang menarik bagi wisatawan,saat ini bali memiliki branding garapan dari kearifan local menuju harapan global,dimana harapan pemerintah dan masyrakat bali adalah menjadikan bali sebagai tujuan wisata yang di terima oleh masyakat Indonesia dan internasional.
2.Paten
Pfizer mematenkan Viagra yang emmilki kandungan slidenafil sitrat karena dapat menyembuhkan penyakit hipertensi dan agina pectoris(kardovaskuller ishchemi.
3.Merek Dagang
Pada tahun 2005 coca cola dinobatkan menjadi merek dagang terkenal di dunia untuk tahun keempat secarat berturut-turut oleh perusahaan konsultan interbrand dengan nilai 67.5 milliar dollar amerika.sebelum mendapatkan paten sudah ada minuman lain di amerika serikat,namun setelah mendapatkan paten coca cola menjadiminuman utama yang di jual di soda fountain took minuman rinagn es krim dan sebagainya bahkan beberapa pasar sudah mengaitkan coca cola dengan sejarah amerika.
4.Hubungan dengan Channel
PT perusahaan dagang dan industry Panamas yang 99% sahamnya dimilki HM Sampoerna di gandeng oleh Philip morris untuk menjadi distributor eksklusif selama sepuluh tahun.selain itu HM Sampoerna juga memiliki anak perusahaan PT Agasam  yang mengelola sejumlah restoran atau cafédan took merchandise dengan label “It’s a Store”saat ini took yang beridi sejak tahun 2003 itu sudah memilki delapan anak cabang yang tersebar di Jakarta dan Surabaya,dengan berbagai pernak-pernik merchandise seperti kaos topi asbak dompet dan tas yang kesemuanya itu logo A dijualdi took ini.
SelainAgamas HM Sampoerna juga memiliki daham di PT Sumber alfaria Trijaya yang mengelola jaringan mini market Bermerek alfamart.****

****:Sumber :Buku Brand Operation,peng,Hermawan kertajaya dan Managing Brand Equity,peng,David Aaker
*** : Sumber : Buku Strategi Pemasaran, Fandi Tjiptono, Penertbit Andi Yogyakarta

Read More

Selasa, 23 Oktober 2012

Posing Guide Photographing Men

| |
0 komentar

Following the previous article on posing when photographing female subjects (update: see below for a complete set of posing guides for kids, couples and more), let’s look at some starting points with men photography. Men are usually less comfortable in process of being photographed, so it’s important to get him to be at ease with the process in order to get good results.
It is always a good idea to prepare before the photo shoot. Just one more peace of advice – involve your subject in the process! He will feel more confident knowing the plan, what he has to “do” and what kind of outcome is expected. Showing this kind of posing cheat sheet to your model is indeed a very good way to prepare your subject for a photo shoot and make him feel more relaxed and confident at the same time.
So, let’s look at some sample poses for men.
1. Very simple pose for a man’s portrait: An upper body shot with crossed arms. Two things to take care of: Shoulders should be pulled back a little, stomach muscles kept in check.
posing-men-subjects01.png
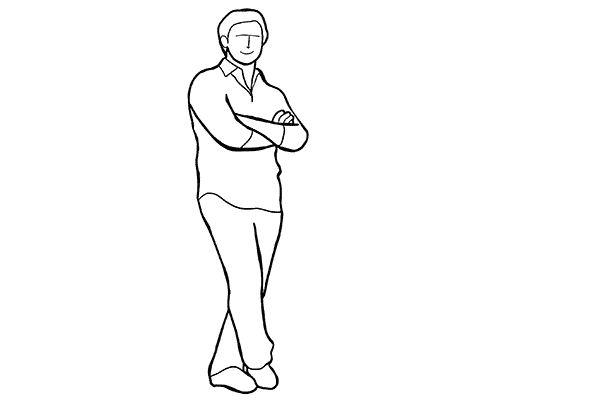
2. Crossed arms works very well in full height shots as well. In addition, ask him to cross one leg in front of the other. But make sure the body weight is not supported equal on both legs, otherwise that would look just awkward!
posing-men-subjects02.png
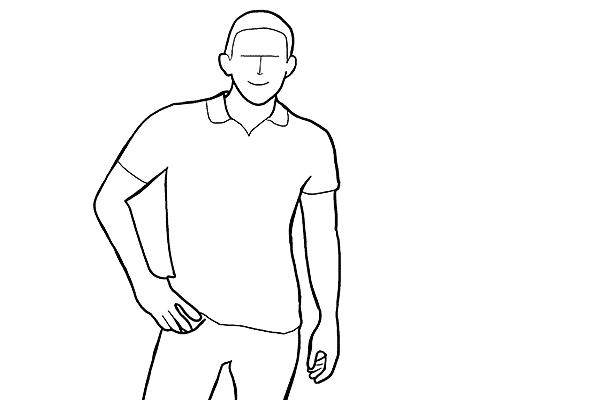
3. A recurring question from your subject might be “Where shall I put my hands?” The solutions is actually quite simple. There are four places to keep in mind (mixed in any combination utilizing both hands). #1. Loosely by the side. #2. On the hips. #3. In the pockets. #4. Both hands crossed on the chest. And in addition – hands should always be relaxed, which means no muscle pressure, except you are photographing a bodybuilder :)
posing-men-subjects03.png
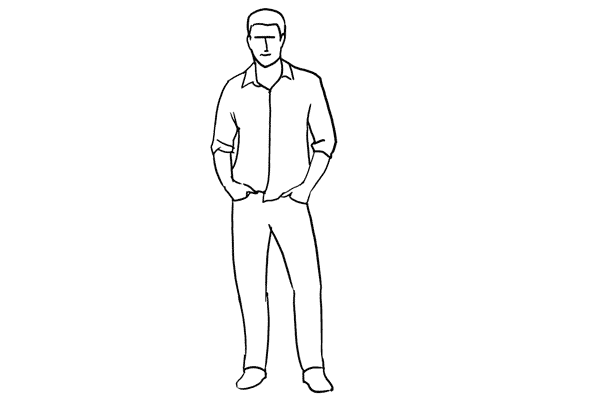
4. A casual pose for an uprightly standing man. Men indeed have a problem with placing their hands, by keeping them fully or partly in the side pockets, you have a sure way to achieve natural and relaxed pose.
posing-men-subjects04.png
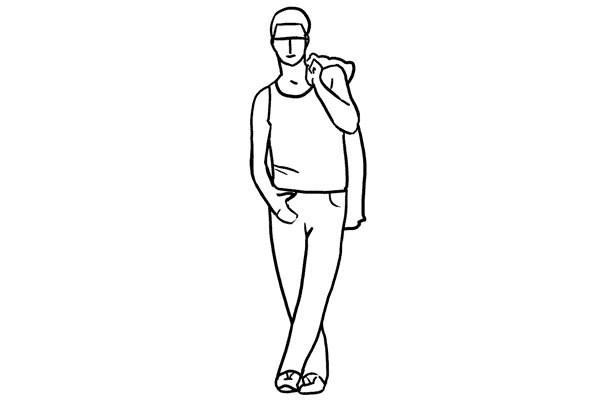
5. Just a slight variation to the previous pose. Some piece of clothing over the shoulder, merely a thumb in the pocket, and legs crossed work very well.
posing-men-subjects05.png
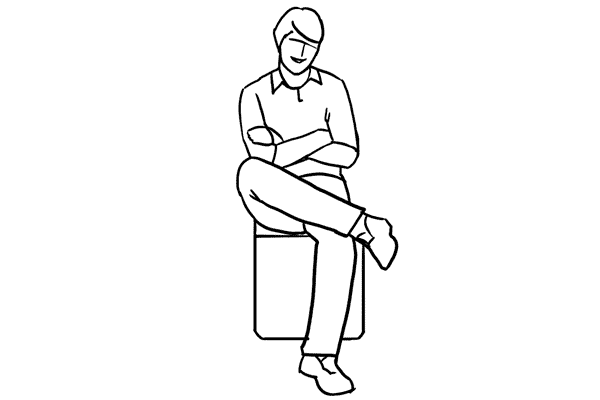
6. For a sitting pose, putting the ankle of one leg onto the knee of the other looks relaxed and natural. Shoot slightly from above.
posing-men-subjects06.png
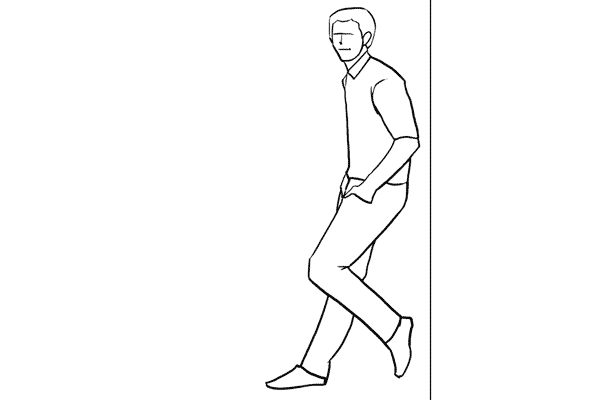
7. Leaning against a wall is just another variant for upright posing.
posing-men-subjects07.png
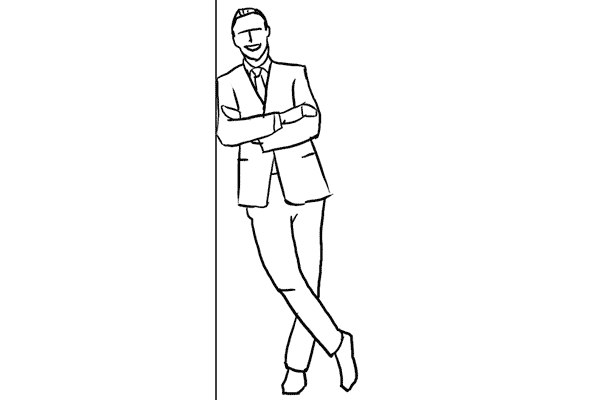
8. The sideways way of leaning against the same wall. Works very well for both casual and formal shots.
posing-men-subjects08.png
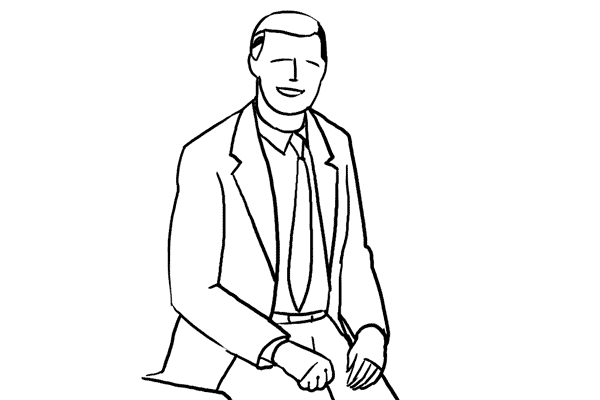
9. Very simple pose for a formal portrait. Items held in the hand (e.g. a laptop, books, or even tools) can work as insignia that point at the subject’s occupation.
posing-men-subjects09.png
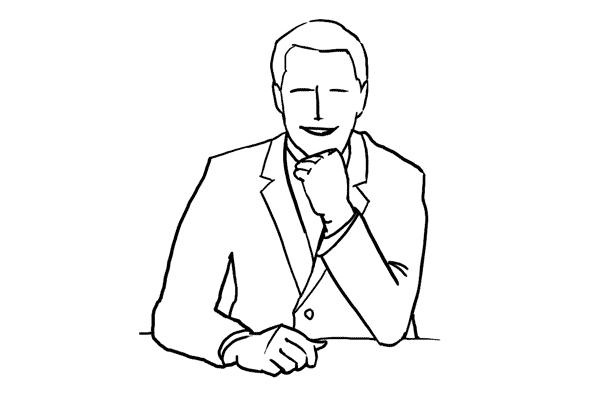
10. Against common belief, it is absolutely fine to make shots of a man sitting partly on a desk. For formal portraits such a pose might counteract rigidness.
posing-men-subjects10.png
11. Very simple pose for a portrait with a man sitting at a desk. To reveal the subject’s profession place work related items on the desk that can function as insignia.
posing-men-subjects11.png
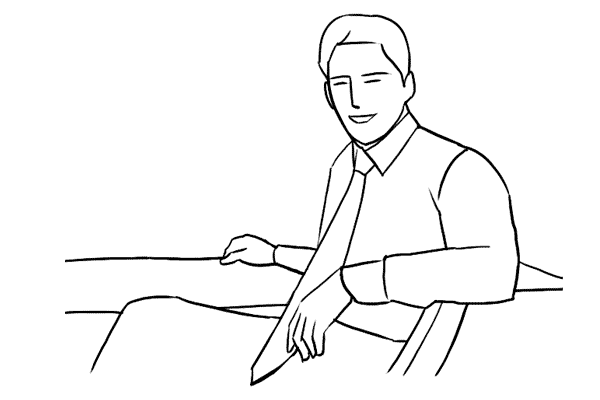
12. A slight variation of the previous pose. Very appropriate for formal portraits.
posing-men-subjects12.png
13. To show the work environment while removing the distance created by a foreground object like a desk, take your shot from the back side. The result will be formal but inviting at the same time.
posing-men-subjects13.png
14. A man supporting himself on a desk with arms crossed. Again you could place work related items on the desk to point to the subject’s profession.
posing-men-subjects14.png
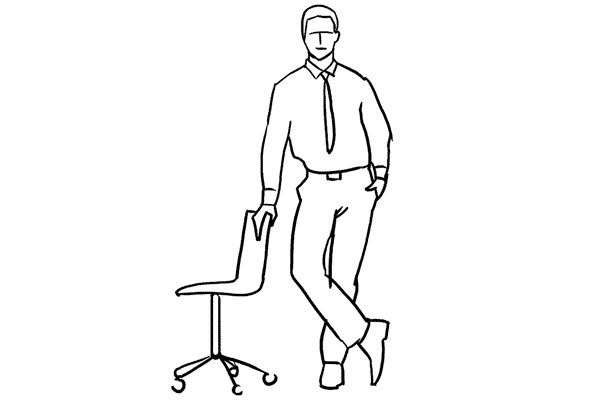
15. Using a chair as a prop can make a portrait more engaging and interesting. Very suitable when introducing creative people in their work environment.
posing-men-subjects15.png
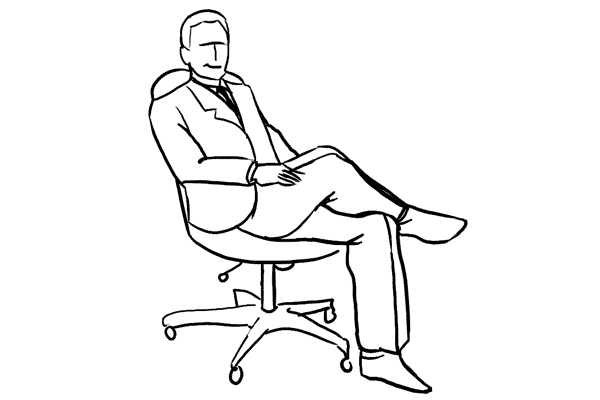
16. Sitting comfortably in a chair usually works for a corporate and formal portraits.
posing-men-subjects16.png
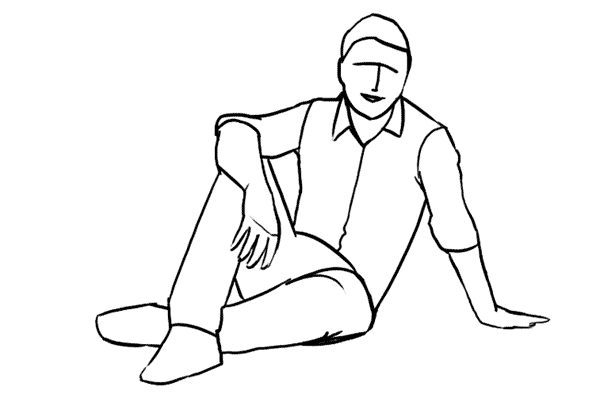
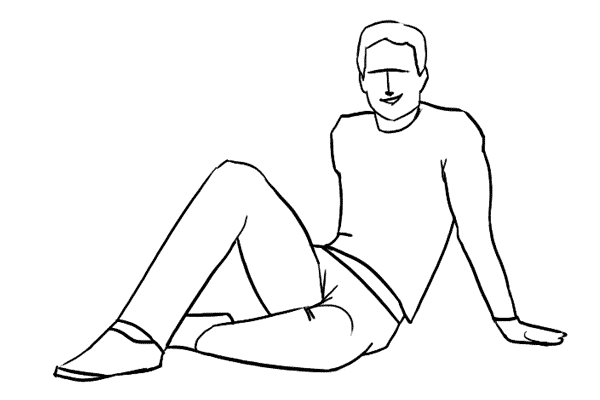
17. Easy and natural pose with a man sitting on the ground. Try different shooting directions and angles.
posing-men-subjects17.png
18. Another variant of a man’s pose while sitting on the ground. Suitable for outdoor locations.
posing-men-subjects18.png
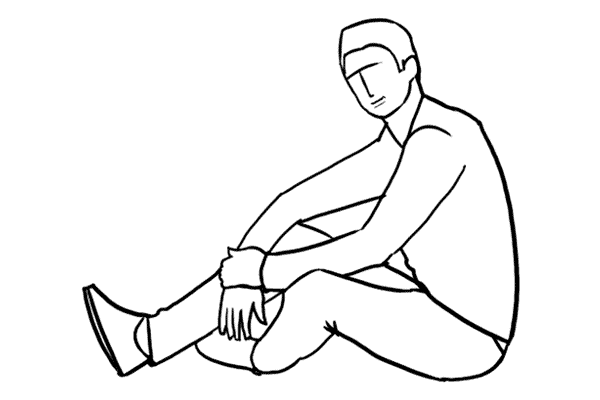
19. An easy and relaxed looking pose for a sitting man.
posing-men-subjects19.png
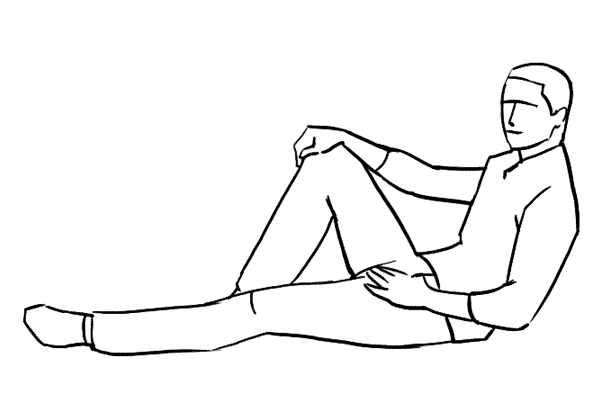
20. Informal pose. The man is sitting on the ground resting his back against the wall or some object.
posing-men-subjects20.png
21. Finally, let your subject be the protagonist of your picture. Never be afraid to crop tightly around the model’s face.
posing-men-subjects21.png
That should be at least something to use as a starting point. Again, remember that there are no absolutes, each sample pose might and should be adjusted depending on your shooting environment and scenario. There is no need to overdo anything. Actually, all you need for good people portraits is simplicity. Simple backgrounds, simple clothing, simple poses and natural expressions.

Read More

Posing Guide Photographing Women Part 1

| |
0 komentar

This is the first in a series of Posing Guide posts by Kaspars Grinvalds from Posing App See below for links to the full series of posing guides including for kids, men, couples, weddings and more. Also check out Part 2 of our Posing Guide for Photographing Women.
If you ever run out of ideas, get stuck in creativity or simply need some guidance when shooting female subjects, you may use following posing samples as a “posing cheat sheet”. Many pro photographers use such a technique when preparing for and during the photo shoot.
The poses in this article are selected as initial reference. I would advise to look at the poses together with your subject, especially if she’s inexperienced. During a photo shoot don’t hesitate to discuss with the subject which pose is or isn’t working in any particular situation. It’s usually very productive and you both will feel more confident in what you are doing.
OK, let’s start, one by one.
posing-photographing-female-models01.png
1. Very simple portrait pose to start with. Have the model look over her shoulder. Note how unusual and interesting a portrait might look, if shot simply from a different angle.
posing-photographing-female-models02.png
2. In portrait photography, hands are usually not visible or at least not dominant. However, you might get creative by asking the model to play around with her hands trying different positions around her head or face. Keep in mind, though: No flat palms, and the hands should only show their sides!
posing-photographing-female-models03.png
3. You might be familiar with composition rules like the rule of thirds. In a similar way, pleasing effects can be created by using diagonals. Also remember that you don’t need to always hold your camera on a perfectly even level. Don’t be afraid to tilt it, you might achieve some interesting and unusual perspectives.
posing-photographing-female-models04.png
4. A really nice and lovely pose with a model sitting. The knees have to touch each other. Shoot slightly from above.
posing-photographing-female-models05.png
5. Another open and inviting pose with the model lying on the ground. Get down and take your shot nearly from the ground level.
posing-photographing-female-models06.png
6. Just a variation for a pose with the model lying on the ground. Both hands might as well be resting on the ground. Works very well outdoors, on the grass or in a wild flower meadow, for example.
posing-photographing-female-models07.png
7. A basic easy pose, yet looks absolutely stunning. Get down and shoot nearly from a ground level. Then try to move gradually around the model while making shots. Also ask your model to change head and hand positions.
posing-photographing-female-models08.png
8. Another easy yet gorgeous pose for all body types. Try different hand and leg positioning. And remember to focus on the model’s eyes!
posing-photographing-female-models09.png
9. A really lovely pose. Works well in different surface settings: The model, for example, might lie on a bed, on the ground, in the grass, or on a sandy beach. Shoot from a very low angle and focus on the eyes.
posing-photographing-female-models10.png
10. Gorgeous and easy pose for a model sitting on the ground.
posing-photographing-female-models11.png
11. Another simple and friendly pose for a model sitting on the ground. Try different directions and angles.
posing-photographing-female-models12.png
12. A wonderful way to demonstrate the beauty of a model’s physique. Works very well as a silhouette when shooting against a bright background.
posing-photographing-female-models13.png
13. A simple and casual looking pose. Lots of variations are possible. Ask the model to twist her body, experiment with hand positioning and try different head turns.
posing-photographing-female-models14.png
14. Another very simple and elegant pose. The model is turned slightly to the side, hands in back pockets.
posing-photographing-female-models15.png
15. Leaning slightly forward can be a very attractive gesture. It is a subtle way to emphasize upper body shapes.
posing-photographing-female-models16.png
16. A sensual pose. By holding the hands above the head body curves are emphasized. Works with fit body types.
posing-photographing-female-models17.png
17. Endless variations are possible for posing in full height. This pose is just the starting point. Ask the model to slightly turn her body, change hand positioning, change head and eye directions etc.
posing-photographing-female-models18.png
18. A relaxed pose with the model standing upright and supporting her back against a wall. Remember that the model may use a wall not only to support her back, but also to put her hands on, or resting a leg against it.
posing-photographing-female-models19.png
19. Note that full height settings are very demanding and work well only with slim to athletic body types. Posing guidelines are simple: The body should be arched in an S shape, hands should be relaxed, while the weight finds support on just one leg.
posing-photographing-female-models20.png
20. An exquisite pose for slim to athletic models. Many variations are possible. In order to find the best posture, tell the model to slowly move her hands and twist her body constantly. When you see a good variant, ask your model to hold still and take some pictures. Repeat for a full set.
posing-photographing-female-models21.png
21. An absolutely romantic and delicate pose. Any kind of cloth (even a curtain) can be used. Note that the back doesn’t need to be completely bare. Sometimes as little as a bare shoulder could work pretty well.
So, there’s something for you to start with. Hope you will find at least couple of poses to work with in different shooting scenarios! Keep in mind that each of the initial sample poses is meant to be only a starting point. Each pose has endless variations! Just be creative and adjust the pose as needed (for example, try different shooting angles and ask your subject to change hand, head and leg positioning etc.

Read More